安全管线 — Constitution · Gateway · 纵深防御
MCP 工具暴露给外部 AI Agent,必须有六层安全链路守护每一次操作。
问题场景
Alembic 通过 MCP 协议把 61+ 工具暴露给 Cursor、VS Code Copilot、Claude Code 等外部 AI Agent。这意味着一个你无法完全控制的 AI 正在调用你的系统——它可能尝试删除 Recipe、覆盖已有知识、在文件系统上执行危险命令。
问题不是"AI 会不会作恶",而是"如何在 AI 犯错时限制爆炸半径"。
传统 Web 应用的安全模型假设攻击者是人——他们需要绕过认证、注入 SQL、提权。MCP 场景的安全模型面对的是一个更奇怪的对象:一个有正当访问权限的 AI Agent,它的行为取决于用户给出的自然语言指令。用户可能说"帮我清理一下知识库",AI 理解为"删除所有过时的 Recipe"——这不是攻击,但如果没有防护,后果一样灾难性。
Alembic 对此的回应是六层纵深防御——不是在入口放一扇门然后信任所有进入者,而是在每个关键路径上都设置独立检查。
Constitution:规则与角色
Constitution 是系统的"宪法"——一个 YAML 文件定义了所有角色的权限边界和行为约束。它是安全链路的第一层,也是所有后续层的配置来源。
三层结构
config/constitution.yaml 由三层构成:
# config/constitution.yaml
version: "3.0"

# 第一层:能力检测(runtime capability probing)
capabilities:
  git_write:
    description: "subrepo git push"
    probe: "git push --dry-run"    # 运行时探测命令
    cache_ttl: 86400               # 结果缓存 24 小时

# 第二层:行为规则(全局约束,适用于所有角色)
rules:
  - id: "destructive_confirm"
    check: "destructive_needs_confirmation"
  - id: "content_required"
    check: "creation_needs_content"
  - id: "ai_no_direct_recipe"
    check: "ai_cannot_approve_recipe"
  - id: "batch_authorized"
    check: "batch_needs_authorization"

# 第三层:角色权限
roles:
  - id: "external_agent"     # IDE 中的 AI Agent
  - id: "chat_agent"         # Dashboard 内置 Agent
  - id: "contributor"        # 团队只读成员
  - id: "visitor"            # 最小权限访客
- id: "developer" # 项目 Owner(全权限)能力层是运行时探测——git_write 能力通过执行 git push --dry-run 判断当前环境是否支持 Git 推送。developer 角色要求 requires_capability: ["git_write"],这意味着即使你在配置中被标记为 developer,如果当前仓库没有 Git 远程地址,你也无法使用需要 git push 的功能。
5 种角色的权限矩阵
| 角色 | 读 Recipe | 读 Guard 规则 | 创建知识 | 发布 Recipe | 删除 | 全权限 |
|---|---|---|---|---|---|---|
developer | ✅ | ✅ | ✅ | ✅ | ✅ | * |
external_agent | ✅ | ✅ | ✅ (→ pending) | ❌ | ❌ | — |
chat_agent | ✅ | ✅ | ✅ (需 reasoning) | ❌ | ❌ | — |
contributor | ✅ | ✅ | ❌ | ❌ | ❌ | — |
visitor | ✅ | ✅ | ❌ | ❌ | ❌ | — |
关键设计:external_agent(IDE AI Agent)可以创建知识,但所有新创建的条目都进入 pending 状态——AI 不能自行决定什么知识应该成为团队规范。发布权始终在人手中。
每个角色的 constraints 字段用自然语言描述额外约束,这些约束不能被权限系统绕过:
# external_agent 的约束
constraints:
  - "can submit knowledge entries (all go to pending)"
  - "cannot publish/deprecate knowledge — only developer can do that"
  - "cannot modify Guard rules"
  - "cannot delete any data"
4 条行为规则
Constitution 定义了 4 条全局行为规则,由 ConstitutionValidator 在 Gateway 的每次请求中执行:
// lib/core/constitution/ConstitutionValidator.ts

// 规则 1:destructive_needs_confirmation
// 删除操作必须携带 confirmed: true 标志
_checkDestructive(req) {
  const destructive = ['delete', 'remove', 'destroy', 'purge', 'batch_delete'];
  if (!destructive.some((w) => req.action?.toLowerCase().includes(w))) {
    return null;  // 不是破坏性操作,跳过
  }
  if (req.data?.confirmed || req.confirmed) {
    return null;  // 已确认
  }
  return { rule: rule.id, reason: '操作未经确认', suggestion: '添加 confirmed: true' };
}

// 规则 2:creation_needs_content
// 创建知识必须提供实际内容(code/content/items/filePaths)
_checkContent(req) {
  const ok = req.data?.code || req.data?.content
    || (Array.isArray(req.data?.items) && req.data.items.length > 0)
    || req.data?.filePaths;
  if (ok) { return null; }
  return { rule: rule.id, reason: '缺少 code/content' };
}

// 规则 3:ai_cannot_approve_recipe
// AI 角色不能直接创建/批准 Recipe
_checkAiRecipe(req) {
  if (!this._isAI(req.actor)) { return null; }
  const isRecipeMod = verb === 'approve' || verb === 'publish'
    || (verb === 'create' && res.includes('recipe'));
  if (!isRecipeMod) { return null; }
  return { rule: rule.id, reason: 'AI 不能直接操作 Recipe' };
}

// 规则 4:batch_needs_authorization
// 批量操作必须携带 authorized: true 标志
_checkBatch(req) {
  if (!req.action?.includes('batch_')) { return null; }
  if (req.data?.authorized) { return null; }
  return { rule: rule.id, reason: '缺少授权标志' };
}
验证流程将请求依次过 4 条规则,收集所有违规(Violation[]),最终由 enforce() 方法决定是否抛出异常。关键设计:多条规则可以同时报告违规——一次请求可能同时违反"未确认"和"缺少内容"两条规则,调用者得到完整的违规清单,而非只看到第一条。
为什么用 YAML 而非数据库
权限配置存在 YAML 文件(而非 SQLite)有三个原因:
- 跟随 Git — Constitution 是团队共识,应该在代码库中版本控制,通过 PR 审核修改
- 启动时加载 — 权限在 Bootstrap Phase 4 加载到内存,后续检查全部是 O(1) 的 Map 查找,不走数据库
- Zod 验证 — 加载时通过 Zod schema 做运行时类型检查,配置错误在启动阶段就暴露
Gateway:4 步安全管线
Gateway 是所有操作的唯一入口。无论请求来自 MCP、HTTP 还是 CLI,都必须通过 Gateway 的 4 步管线:
请求 → validate → guard → route → audit → 响应完整管线代码
// lib/core/gateway/Gateway.ts
async execute(request: GatewayRequest): Promise<GatewayResult> {
  const requestId = uuidv4();
  const startTime = Date.now();

  try {
    // ═══ Step 1: VALIDATE — 请求格式检查 ═══
    this.validateRequest(request);

    // ═══ Step 2: GUARD — 权限 + 宪法规则 ═══
    await this.guard(context);

    // ═══ Step 3: ROUTE — 分发到处理器 ═══
    const result = await this.routeToHandler(context);

    // ═══ Step 4: AUDIT — 记录成功日志 ═══
    await this.auditSuccess(context, result);

    return { success: true, requestId, data: result, duration: Date.now() - startTime };
  } catch (error: unknown) {
    // 失败也审计 — 确保所有操作都留痕
    await this.auditFailure(context, { message: errMsg, code: errLike?.code });

    return { success: false, requestId, error: { message: errMsg, code: ... } };
  }
}
Step 1: Validate
最简单的一步——检查请求的必填字段:
validateRequest(request: GatewayRequest) {
  if (!request.actor) {
    throw new InternalError('Missing required field: actor');
  }
  if (!request.action) {
    throw new InternalError('Missing required field: action');
  }
}
为什么这么简单?因为参数的细粒度验证应该在 Service 层由各自的 schema 负责。Gateway 只需要确保请求不是空的——"谁在做什么"必须明确。
Step 2: Guard
安全链路的核心——先检查权限,再检查宪法规则:
async guard(context: GatewayContext) {
  // 2a. 权限检查
  if (this.permissionManager) {
    this.permissionManager.enforce(context.actor, context.action, context.resource);
  }

  // 2b. 宪法规则检查
  if (this.constitutionValidator) {
    await this.constitutionValidator.enforce({
      actor: context.actor,
      action: context.action,
      resource: context.resource,
      data: context.data,
    });
  }
}
两者是串行的:先检查"你有没有权限做这件事"(PermissionManager),再检查"这件事本身是否合规"(ConstitutionValidator)。一个 external_agent 有 create:candidates 权限,但如果请求体里没有 content 字段,仍然会被宪法规则 creation_needs_content 拦截。
Step 3: Route
通过 GatewayActionRegistry 预注册的路由表分发请求:
async routeToHandler(context: GatewayContext) {
  const handler = this.routes.get(context.action);
  if (!handler) {
    throw new InternalError(`No handler found for action: ${context.action}`);
  }
  return await handler(context);
}
GatewayActionRegistry 在系统初始化时将所有 MCP 工具操作注册为 Gateway 动作:
// lib/core/gateway/GatewayActionRegistry.ts
export function registerGatewayActions(gateway, container) {
  gateway.register('candidate:create', async (ctx) => {
    const service = container.get('knowledgeService');
    return service.create(ctx.data, { userId: ctx.actor });
  });

  gateway.register('candidate:approve', async (ctx) => {
    const service = container.get('knowledgeService');
    return service.approve(ctx.data.candidateId, { userId: ctx.actor });
  });

  gateway.register('guard_rule:check_code', async (ctx) => {
    const service = container.get('guardService');
    return service.checkCode(ctx.data.code, ctx.data.options);
  });

  // ... 20+ 个动作
}
每个路由处理器都是一个胶水函数:从 DI 容器获取 Service,传入请求参数,返回结果。处理器始终传递 userId: ctx.actor,确保下游 Service 知道操作者身份(用于审计和权限回溯)。
Step 4: Audit
无论请求成功还是失败,都会被记录到审计日志。注意,失败审计在 catch 块中——即使请求在 Step 2 被权限拦截、或在 Step 3 因业务逻辑抛出异常,审计仍然会执行。
// 成功审计
async auditSuccess(context, result) {
  await this.auditLogger.log({
    requestId: context.requestId,
    actor: context.actor,     // WHO
    action: context.action,   // WHAT
    resource: context.resource, // WHERE
    result: 'success',
    duration: Date.now() - context.startTime,
  });

  // 实时事件推送到 Dashboard
  this.eventBus.emit('gateway:action:completed', { ... });
}

// 失败审计 — 在 catch 块中调用
async auditFailure(context, error) {
  await this.auditLogger.log({
    ...context,
    result: 'failure',
    error: error.message,
  });

  this.eventBus.emit('gateway:action:failed', { ... });
}审计日志的一个关键设计:审计失败不阻断业务逻辑。AuditLogger.log() 内部的所有异常都被 catch 吞掉——如果 SQLite 写入失败(磁盘满、锁超时),日志会丢失,但请求仍然正常处理。这是一个权衡:审计的重要性不值得牺牲系统的可用性。
PermissionManager:3-tuple 权限检查
PermissionManager 实现了经典的 RBAC 模型,但做了 MCP 场景的适配:权限检查用 3-tuple (actor, action, resource) 模式,支持 8 级递进匹配:
// lib/core/permission/PermissionManager.ts
check(actor: string, action: string, resource: string | undefined): PermissionCheckResult {
  const role = this.constitution.getRole(actor);
  if (!role) {
    return { allowed: false, reason: `Unknown role: ${actor}` };
  }

  const permissions = role.permissions || [];

  // Level 1: 通配符 *(developer 角色)
  if (permissions.includes('*')) {
    return { allowed: true, reason: 'Admin role' };
  }

  // Level 2: 精确匹配 — create:candidates
  if (permissions.includes(requiredPermission)) {
    return { allowed: true };
  }

  // Level 3: 格式翻转 — Gateway 用 candidate:create,Constitution 用 create:candidates
  const flipped = `${parts[1]}:${resourceType}`;
  if (permissions.includes(flipped)) {
    return { allowed: true };
  }

  // Level 4: 动作通配 — create:*
  // Level 5: 资源通配 — *:recipes
  // Level 6: 读全部 — read:*
  // Level 7: 特殊权限 — read:audit_logs:self
  // Level 8: 拒绝
  return { allowed: false, reason: `Missing permission: ${requiredPermission}` };
}
为什么需要"格式翻转"(Level 3)?因为 Gateway 的动作名是 candidate:create(资源:动词),而 Constitution 的权限名是 create:candidates(动词:资源)。两种格式都合理,强制统一会增加配置的认知负担,所以 PermissionManager 两种都试——用户怎么写都能匹配。
enforce() 方法在检查失败时抛出 PermissionDenied 异常,被 Gateway 的 catch 块捕获并转为结构化错误响应:
enforce(actor, action, resource) {
  const result = this.check(actor, action, resource);
  if (!result.allowed) {
    throw new PermissionDenied(
      `Permission denied: ${actor} cannot ${action} on ${resource}. Reason: ${result.reason}`
    );
  }
}
SafetyPolicy:Agent 行为沙箱
前三层(Constitution → Gateway → Permission)守护的是"谁能做什么操作"。但 Agent 在推理循环中还会调用工具执行命令——SafetyPolicy 在 Agent 执行层做最后一道防线。
命令黑名单与白名单
// lib/agent/policies.ts
export class SafetyPolicy extends Policy {
  static DANGEROUS_COMMANDS = Object.freeze([
    /\brm\s+-rf\s+[/~]/,           // rm -rf / 或 ~/
    /\bsudo\b/,                     // sudo
    /\bmkfs\b/,                     // 格式化文件系统
    /\bdd\s+if=/,                   // 磁盘复制
    /\b(shutdown|reboot|halt)\b/,   // 关机
    />\s*\/dev\//,                  // 重定向到 /dev/
    /\bcurl\b.*\|\s*(bash|sh)/,    // curl | bash 管道注入
    /\bchmod\s+777/,               // chmod 777
    /\bpasswd\b/,                  // 修改密码
    /\bkillall\b/,                 // 杀死所有进程
  ]);

  static SAFE_COMMANDS = Object.freeze([
    'ls', 'cat', 'head', 'tail', 'grep', 'find', 'wc', 'echo', 'pwd',
    'git log', 'git status', 'git diff', 'git branch',
    'npm list', 'npm outdated', 'node -v',
  ]);
}
10 条危险命令正则基于 OWASP 命令注入防护——它们不只是"可能有害",而是"在本地化工具场景下几乎不可能有合理用途"。curl | bash 是远程代码执行的经典攻击向量;rm -rf / 是文件系统灾难。白名单则列出了 20+ 个只读命令,Agent 可以自由调用这些命令获取信息。
三维防护
SafetyPolicy 在三个维度同时工作:
// 维度 1:命令安全 — 拦截危险 shell 命令
checkCommand(command: string) {
  for (const pattern of this.#commandBlacklist) {
    if (pattern.test(command)) {
      return { safe: false, reason: `Blocked: matches dangerous pattern ${pattern}` };
    }
  }
  return { safe: true };
}

// 维度 2:文件范围 — 限制文件操作在项目目录内
checkFilePath(filePath: string) {
  if (!this.#fileScope) { return { safe: true }; }
  const resolved = path.resolve(filePath);
  if (!resolved.startsWith(path.resolve(this.#fileScope))) {
    return { safe: false, reason: `Path outside allowed scope: ${this.#fileScope}` };
  }
  return { safe: true };
}

// 维度 3:发送者认证 — 只允许授权的消息来源
validateBefore(context) {
  if (this.#allowedSenders.length > 0) {
    const senderId = context.message?.sender?.id;
    if (!senderId || !this.#allowedSenders.includes(senderId)) {
      return { ok: false, reason: `sender "${senderId}" not in allowlist` };
    }
  }
  return { ok: true };
}
PolicyEngine 在 Agent 每次工具调用前执行所有注册的 Policy:
// PolicyEngine.validateToolCall() — 实时工具拦截
validateToolCall(toolName, args) {
  const safety = this.get(SafetyPolicy);
  if (!safety) { return { ok: true }; }

  // 拦截 shell 命令
  if (toolName === 'run_safe_command' && args?.command) {
    const check = safety.checkCommand(args.command);
    if (!check.safe) { return { ok: false, reason: check.reason }; }
  }

  // 拦截文件读写路径
  if ((toolName === 'write_project_file' || toolName === 'read_project_file') && args?.filePath) {
    const check = safety.checkFilePath(args.filePath);
    if (!check.safe) { return { ok: false, reason: check.reason }; }
  }

  return { ok: true };
}
PathGuard:文件系统双层沙箱
PathGuard 是文件系统层面的安全屏障——即使请求通过了前四层的权限检查,文件写入操作仍然必须通过 PathGuard 的双层验证。
双层防护
// lib/shared/PathGuard.ts

// 白名单:项目内允许写入的目录
const PROJECT_WRITE_SCOPE_PREFIXES = [
  '.asd',  // 运行时 DB、记忆、对话
  '.cursor',       // Cursor IDE 集成
  '.vscode',       // VSCode 集成
  '.github',       // Copilot instructions
];

const PROJECT_ROOT_WRITABLE_FILES = ['.gitignore', '.env'];
Layer 1: assertSafe() — 边界检查
确保路径在项目根目录或已知安全目录内:
assertSafe(targetPath: string) {
  const resolved = path.resolve(targetPath);

  // 1. 在项目目录内 → 通过
  if (this.#isUnder(resolved, this.#projectRoot!)) { return; }

  // 2. 在 Alembic 包目录内 → 通过
  if (this.#packageRoot && this.#isUnder(resolved, this.#packageRoot)) { return; }

  // 3. 在白名单目录内 → 通过
  for (const allowed of this.#allowList) {
    if (this.#isUnder(resolved, allowed)) { return; }
  }

  // 越界 → 抛出异常
  throw new PathGuardError(resolved, this.#projectRoot!);
}
Layer 2: assertProjectWriteSafe() — 作用域检查
即使路径在项目内,也只能写入白名单目录:
assertProjectWriteSafe(targetPath: string) {
  this.assertSafe(targetPath);  // 先通过 Layer 1

  const resolved = path.resolve(targetPath);
  const relative = path.relative(this.#projectRoot!, resolved);
  const firstSegment = relative.split(path.sep)[0];

  // 开发仓库保护
  if (this.#isDevRepo) {
    if (firstSegment === '.asd') {
      throw new PathGuardError(resolved, this.#projectRoot!,
        'Dev repo 保护: 禁止在源码仓库内创建 .asd/ 运行时数据');
    }
    // ... kbDir 也被阻止
  }

  // 标准项目:只允许白名单前缀
  for (const prefix of PROJECT_WRITE_SCOPE_PREFIXES) {
    if (firstSegment === prefix) { return; }  // ✅ 通过
  }

  // 知识库目录(动态配置)
  const kbDir = this.#resolveKnowledgeBaseDir();
  if (kbDir && firstSegment === kbDir) { return; }

  // 根级可写文件
  if (PROJECT_ROOT_WRITABLE_FILES.includes(relative)) { return; }

  // 项目内但非白名单 → 拒绝
  throw new PathGuardError(resolved, this.#projectRoot!,
    `项目内写入范围受限: "${relative}" 不在允许的目录中`);
}
防护矩阵
| 场景 | Layer 1 | Layer 2 | 结果 |
|---|---|---|---|
写入 /var/log/evil.txt | ❌ 越界 | — | 拒绝 |
写入 src/main.ts | ✅ 项目内 | ❌ 非白名单 | 拒绝 |
写入 .asd/db.sqlite | ✅ 项目内 | ✅ 白名单 | 允许 |
写入 .cursor/rules/api.md | ✅ 项目内 | ✅ 白名单 | 允许 |
写入 Alembic/recipes/r1.md | ✅ 项目内 | ✅ kbDir | 允许 |
写入 .gitignore | ✅ 项目内 | ✅ 根级文件 | 允许 |
Dev repo 写入 .asd/ | ✅ 项目内 | ❌ Dev保护 | 拒绝 |
关键是第二行:即使文件在项目内,Alembic 也不能写入 src/ 等业务代码目录。知识引擎只操作自己的数据(.asd/、知识库目录、IDE 配置),不触碰用户的源代码。
ConfidenceRouter:知识质量门控
六层安全链路的最后一层不是基于权限的,而是基于质量的。ConfidenceRouter 根据知识的置信度和质量评分决定发布路径——低质量知识不得自动进入知识库。
6 级决策管线
// lib/service/knowledge/ConfidenceRouter.ts
async route(entry: KnowledgeEntry): Promise<RouteResult> {
  const confidence = entry.reasoning?.confidence ?? 0;

  // Stage 1: 内容不完整 → pending
  if (!entry.isValid()) {
    return { action: 'pending', reason: 'Content incomplete' };
  }

  // Stage 2: 置信度 < 0.2 → reject(直接 deprecated)
  if (confidence < 0.2 && confidence > 0) {
    return { action: 'reject', targetState: 'deprecated' };
  }

  // Stage 3: 内容太短(< 20 字符)→ pending
  if (contentLength < 20) {
    return { action: 'pending', reason: 'Content too short' };
  }

  // Stage 4: 缺少推理链 → pending
  if (requireReasoning && !entry.reasoning?.isValid?.()) {
    return { action: 'pending', reason: 'Reasoning not provided' };
  }

  // Stage 5: 质量评分过低(< 0.3)→ pending
  if (qualityScore !== null && qualityScore < 0.3) {
    return { action: 'pending', reason: 'Quality too low' };
  }

  // Stage 6: 置信度达标 → auto_approve + Grace Period
  const threshold = isTrusted ? 0.70 : 0.85;
  if (confidence >= threshold) {
    const gracePeriod = confidence >= 0.90 ? 24 * 3600000 : 72 * 3600000;
    return { action: 'auto_approve', targetState: 'staging', gracePeriod };
  }

  // 默认:待人工审核
  return { action: 'pending' };
}
分级决策表
| 条件 | 决策 | 目标状态 | Grace Period |
|---|---|---|---|
| 内容不完整 | pending | — | — |
| 置信度 < 0.2 | reject | deprecated | — |
| 内容 < 20 字符 | pending | — | — |
| 缺少推理链 | pending | — | — |
| 质量评分 < 0.3 | pending | — | — |
| 置信度 ≥ 0.85(标准) | auto_approve | staging | 72 小时 |
| 置信度 ≥ 0.90(高置信) | auto_approve | staging | 24 小时 |
| 置信度 ≥ 0.70(可信来源) | auto_approve | staging | 72 小时 |
| 其他 | pending | — | — |
注意 auto_approve 的目标状态是 staging 而非 active——即使高置信度的知识,也需要经过 Grace Period 才能正式发布。这段观察期内,开发者有机会通过 Dashboard 审核并驳回。
可信来源(bootstrap、cursor-scan、mcp)的阈值更低(0.70 vs 0.85),因为这些是系统内部分析产出的知识,相比用户在对话中随口提交的知识更可靠。
六层安全链路全景
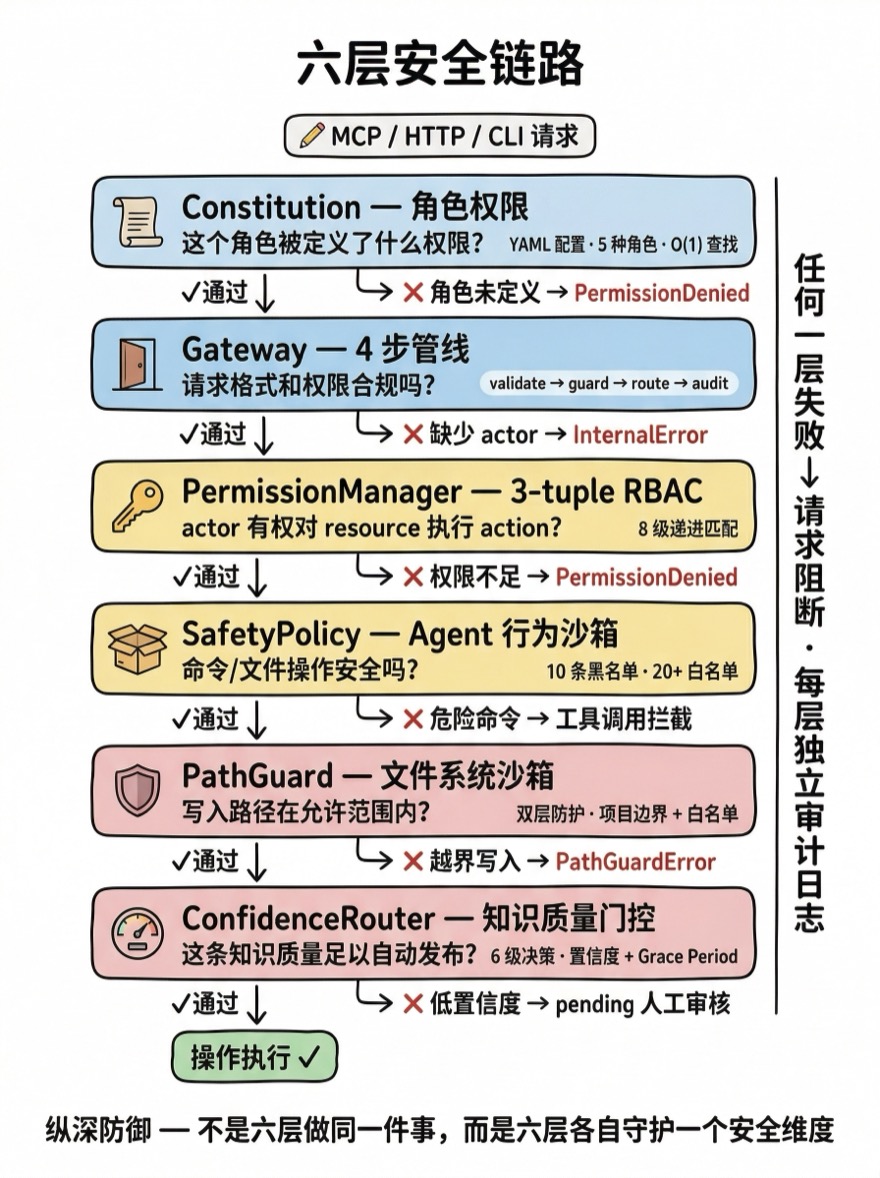
六层按请求路径串联,每层解决一个特定维度的安全问题:
MCP/HTTP/CLI 请求
  │
  ▼ Layer 1: Constitution
  │ "这个角色被定义了什么权限和约束?"
  │ YAML 加载到内存,O(1) Map 查找
  │
  ▼ Layer 2: Gateway.guard()
  │ "这个请求的格式和权限合规吗?"
  │ validate → guard(Permission + Constitution) → route → audit
  │
  ▼ Layer 3: PermissionManager
  │ "actor 有权限对 resource 执行 action 吗?"
  │ 8 级递进匹配,精确 → 翻转 → 通配 → 拒绝
  │
  ▼ Layer 4: SafetyPolicy
  │ "Agent 要执行的命令/文件操作安全吗?"
  │ 10 条危险命令正则黑名单,20+ 安全命令白名单
  │
  ▼ Layer 5: PathGuard
  │ "文件写入路径在允许范围内吗?"
  │ Layer1 边界检查 + Layer2 白名单作用域
  │
  ▼ Layer 6: ConfidenceRouter
  │ "这条知识的质量足以自动发布吗?"
  │ 6 级决策管线,置信度 + 质量评分 + Grace Period
  │
  ▼ 操作执行
每层的失败都是独立的:
- Constitution 找不到角色 →
PermissionDenied - Gateway validate 缺少 actor →
InternalError - Permission 缺少权限 →
PermissionDenied - SafetyPolicy 匹配危险命令 → 工具调用被拦截
- PathGuard 越界写入 →
PathGuardError - ConfidenceRouter 低置信度 → 知识进入 pending 而非 auto_approve
任何一层的失败都足以阻断请求。这就是纵深防御的含义——不是六层做同一件事,而是六层各自独立地守护一个维度。即使某一层因为 bug 失效,其他五层仍然在工作。
AuditLogger:操作留痕
所有经过 Gateway 的操作都会被记录到 SQLite 的审计日志表中:
// lib/infrastructure/audit/AuditLogger.ts
async log(entry) {
  const auditEntry = {
    id: requestId,
    timestamp: Date.now(),
    actor: entry.actor,              // WHO — 操作者角色
    action: entry.action,            // WHAT — 操作类型
    resource: entry.resource,        // WHERE — 目标资源
    operation_data: JSON.stringify(entry.data), // HOW — 请求参数
    result: entry.result || 'success',  // OUTCOME — 成功/失败
    error_message: entry.error,      // WHY FAILED — 失败原因
    duration: entry.duration,        // PERF — 响应时间
  };

  await this.auditStore.save(auditEntry);

  // 实时推送到 Dashboard
  if (this.#eventBus) {
    this.#eventBus.emit('audit:entry', { ... });
  }
}
每条审计记录回答 5 个问题:谁(actor)做了什么(action)对什么资源(resource)结果如何(result)用了多久(duration)。失败记录额外携带 error_message,可以追溯具体哪一层拦截了请求。
AuditStore 支持多维度查询和统计:
// 按角色查询 — "external_agent 最近做了什么"
getByActor(actor, limit = 100)

// 按结果过滤 — "最近有哪些失败的操作"
getFailures(limit = 100)

// 聚合统计 — "过去 24 小时的成功率和响应时间"
getStats('24h')
// → { total: 1250, success: 1180, failure: 70, successRate: "94.4%", avgDuration: "245ms" }

// 清理 — "保留 90 天内的日志"
cleanup({ maxAgeDays: 90 })
审计是安全链路的"黑匣子"——当出现异常行为时(比如某个 Agent 反复触发 PermissionDenied),审计日志提供了完整的回溯链条。
运行时行为
场景 1:external_agent 尝试删除 Recipe
→ Gateway.execute({ actor: 'external_agent', action: 'recipe:delete', data: { id: 'r-123' } })
  → Step 1: validate ✅ (有 actor 和 action)
  → Step 2: guard
    → PermissionManager.enforce('external_agent', 'recipe:delete', ...)
    → 角色权限中没有 delete:recipes
    → ❌ throw PermissionDenied("Missing permission: delete:recipes")
  → catch → auditFailure(... error: "Permission denied")
  → return { success: false, error: { code: 'PERMISSION_DENIED' } }
请求在 Layer 3 被拦截。即使绕过权限检查,Layer 2 的 destructive_needs_confirmation 规则也会要求 confirmed: true 标志。
场景 2:chat_agent 提交候选知识
→ Gateway.execute({ actor: 'chat_agent', action: 'candidate:create', data: { code: '...', reasoning: {...} } })
  → Step 1: validate ✅
  → Step 2: guard
    → PermissionManager.enforce('chat_agent', 'candidate:create', ...) ✅ (有 create:candidates 权限)
    → ConstitutionValidator.enforce(...) ✅ (有 content,不是直接操作 recipe)
  → Step 3: route → KnowledgeService.create()
    → ConfidenceRouter.route(entry) → { action: 'pending', reason: '...' }
    → 条目进入 pending 状态
  → Step 4: auditSuccess(...)
  → return { success: true, data: { id: 'k-456', state: 'pending' } }
完整管线走通。知识被创建但进入 pending——ConfidenceRouter 确保即使权限允许创建,低质量知识也不会自动发布。
场景 3:Agent 尝试写入项目外文件
→ AgentRuntime 执行 write_project_file({ filePath: '/etc/hosts', content: '...' })
  → PolicyEngine.validateToolCall('write_project_file', { filePath: '/etc/hosts' })
    → SafetyPolicy.checkFilePath('/etc/hosts')
    → ❌ 路径不在项目 scope 内
    → return { ok: false, reason: "Path outside allowed scope" }
  → 工具调用被拦截,Agent 收到错误响应
SafetyPolicy(Layer 4)在 Agent 执行工具前拦截。即使 SafetyPolicy 失效,PathGuard(Layer 5)会在文件实际写入时抛出 PathGuardError。
权衡与替代方案
为什么不用 OAuth / JWT
Alembic 是本地化工具——它运行在开发者的机器上,通过 stdio 与 MCP 客户端通信。没有网络请求,没有 HTTP header,没有 cookie。OAuth 和 JWT 解决的是"跨网络认证"问题,而 Alembic 的安全问题是"同一台机器上不同信任级别的进程间通信"。
Constitution 的角色标识直接通过 MCP 请求的 actor 字段传递——MCP 服务器在初始化时确定调用者角色(通常是 external_agent),不需要 token 交换。
为什么六层而非一层
单层安全检查意味着单点失败。如果唯一的权限检查有 bug——比如某个 action 名被错误匹配——所有防护都消失。六层的好处是它们守护不同维度:
- Layer 1-3 守护"谁能做什么"(身份 + 权限)
- Layer 4 守护"能执行什么命令"(命令 + 路径)
- Layer 5 守护"能写到哪里"(文件系统范围)
- Layer 6 守护"什么质量能上线"(知识质量门控)
这些维度是正交的——Permission 检查通过不代表命令是安全的,命令安全不代表路径合法,路径合法不代表知识质量达标。
性能开销
六层检查的延迟:
| 层 | 耗时 | 原因 |
|---|---|---|
| Constitution 角色查找 | < 0.01ms | 内存 Map.get() |
| Gateway validate | < 0.01ms | 字段存在性检查 |
| Permission check | < 0.1ms | 8 级字符串匹配 |
| Constitution rule check | < 0.1ms | 4 条规则遍历 |
| SafetyPolicy | < 0.1ms | 10 条正则匹配 |
| PathGuard | < 0.1ms | path.resolve + startsWith |
| ConfidenceRouter | < 1ms | 数值比较 + 可选质量评分 |
| Audit(SQLite 写入) | ~1-5ms | 磁盘 IO |
六层安全检查的总开销 < 1ms(不含审计写入)。审计是唯一有真实 IO 的环节(~1-5ms),但它是异步的且不阻断业务响应。 对比 MCP 请求的端到端延迟(通常 50-500ms,取决于 Service 层逻辑),安全开销可以忽略。
小结
Alembic 的安全不是一扇门,而是一条层层设卡的通道:
- Constitution 用 YAML 定义规则,跟随 Git 版本控制,启动时加载到内存
- Gateway 是唯一入口,4 步管线确保每次操作都被验证、守护、路由和审计
- PermissionManager 用 8 级递进匹配实现灵活的 3-tuple 权限检查
- SafetyPolicy 用命令黑名单和文件范围限制 Agent 的执行能力
- PathGuard 用双层边界检查确保文件写入不越界
- ConfidenceRouter 用质量门控确保低质量知识不会自动进入知识库
六层的共同特征:每层独立记录日志,每层有自己的错误类型,每层的失败不依赖其他层的成功。这不是过度设计——当你的系统消费者是不可控的 AI Agent 时,任何单点信任都是脆弱的。